Table of Contents
Dispatcher service reference
The configuration of the Dispatcher service is done through the Console. You can configure the following items/functionalities:
- Dispatcher preferences
- Render pools
- Unix substitution paths
- Muster users database
- Muster mailing lists
Dispatcher preferences
The dispatcher preferences window lets you configure every behaviour of the Dispatcher service: The following window shows the General properties:

- Start Dispatcher selection engine on startup: Tells Muster to automatically start the Dispatcher selection engine after the boot sequence
- Remove orphaned instances: When an instance connects, Muster checks the total amount of instances for that node, and remove previously registered ones, if present.
- On templates editing, backup snapshots: When you change the templates on the Dispatcher service, an entire snapshot of the current status is backed up on a dedicated folder into the templates folder
- Distinguish instances by: This tells the Dispatcher what parameter to use to distinguish the render client instances. If you change from IP address to host name (i.e.) you’re allowed to use a DHCP to assign the addresses to the render farm
- Maximum concurrent tasks threads: Defines the maximum amount of tasks (Image assembling, pre/post job actions) runnable by the Dispatcher
- Requeue chunks on disconnection: If an instance is disconnected and flagged offline, tells Muster to requeue the chunk assigned to that particular instance
- Global chunks timeout in minutes: Defines a global amount of time in minutes to use as a timeout value for chunks processing
- Maximum chunks requeue: Defines a global maximum amount of times a chunk can be requeued
- On chunk failure, abort client activity: If the timeout for a chunk expires, Muster tries to abort the client activity that may be locked
- Substitution Paths are case sensitive: Defines the sensitivity of the substitution paths case
If you want to impersonate a different user during Dispatcher file access operations like Image slicing assembling, you can force it here filling the Username and password fields.
The following window shows the Network properties:

- Clients network port: Defines the TCP/IP network port used to listen for incoming instances connections
- Management network port: Defines the TCP/IP network port used to listen for incoming management connections
- Notificators network port: Defines the TCP/IP network port used to listen for incoming notificators connections
- Heartbeat resolution: Defines an interval to be used to send pulses to the clients to check they are still alive
- Clients RX buffer: Defines the amount of bytes storable in the network buffers
- Clients TX buffer: Defines the amount of bytes storable in the network buffers
- Management RX buffer: Defines the amount of bytes storable in the network buffers
- Management TX buffer: Defines the amount of bytes storable in the network buffers
- Notificators TX buffer: Defines the amount of bytes storable in the network buffers
- Maximum attempts: Defines the maximum number of attempts the Dispatcher does to wake up an host using the Magic Packet technology. A value of 0 disables the wake up globally
- Warm up in seconds: To give time on a full reboot , you can specify a warm up in seconds required before starting the Wake up logic
- Delay between each attempt: Defines the delay between each wakeup attempt
- Update internal statistics each: Defines an interval to use to update and store the internal status of the Dispatcher.
- Broadcast network statistics each: Defines an interval to use to broadcast the internal status of the Dispatcher to Consoles.
The following window shows the Queue properties:

- Database driver: Choose the driver to use to access the Muster database (Sqlite, Mysql or Sql server). You’re allowed to use Sql server only on a Windows based Dispatcher.
- Database address: The IP address of the database if applicable
- Login username: The login name to access the database
- Login password: The password to access the database
- Database name: The name of the Muster database
- History database name: The name of the Muster history database
- Enable in-process cache: Enable the in-memory caching of the database data improving performances but increasing memory usage
- Build jobs status array: Builds an array of statuses for each job to display the status of each chunk in the progress bar
- Submit jobs in paused status: New jobs are submitted paused
- Flag completed jobs as archived: If active, jobs are automatically flagged as archived at the end of the render
- Flag jobs as archived after: Specifies an interval for the automatic archive feature
- Prefilter parent pool: If activated, a folder that specifies a destination pool will filter the hosts available to childs jobs, regardless of the settings of the pool of the childs jobs, that may apply an additional filter
- Notifications: Defines which kind of notification you want to be sent to Notificators
The following window shows the logs properties:

- Severity level: Specifies the severity level for the activity logs
- Destination folder: Specifies a destination path for the logs
- Clear logs older than: Tells the Dispatcher to automatically clear the logs after a certain amount of days
- Clear older logs when the size exceeds: Tells the Dispatcher to automatically clear the logs when their cumulative size exceeds a certain amount of Megabytes
- Enable system events: Tells Muster to log events related to the Dispatcher activity
- Enable users events: Tells Muster to log events related to users actions
- Enable hosts events: Tells Muster to log events related to hosts activity
- Enable hosts failure events: Tells Muster to log events related to hosts failures
- Clear the log on: Automatically clear the logs when it reaches the specified amount of entries
- Send the log on e-mail at: Sends a dump of the log on the mail specified in the mail configuration section when it reaches the specified amount of entries
- Log processes command line: Adds the command line used to start the process at the top of each log file
- Log processes return codes: Adds the process exit code at the bottom of each log file
The following window shows the Actions properties:

- Job actions failures Pause job: Tells Muster to pause a job if it encounters a failure during an action execution
- Job actions failure Lock job: Tells Muster to lock a job if it encounters a failure during an action execution
- Chunks actions failures Add job to exclusions list: Tells Muster to put a job in the client exclusions lists if it fails a chunk’s action
- Chunks actions failures Add template to exclusions list: Tells Muster to put a job template in the client exclusions lists if it fails a chunk’s action
- Chunks actions failures Requeue chunk: Tells Muster to requeue a chunk if It fails the pre post chunk action
- Chunks actions failure Abort processing: Tells Muster to abort a chunk processing if it fails the pre chunk action
- Actions timeout in seconds: Defines a global timeout value for actions
- Global pre/post job/chunk actions: Defines an executable to be launched as a pre/post job or chunk action
- Check return code: Tells Muster to check the return code of the action
- Override action timeout: Overrides the default action timeout
The following window shows the Logs faults properties:

- Logs warnings enable checkBold Text: Tells Muster to enable checking of warnings inside the logs produced by a process. Searched keywords or contents are specified in each template
- Logs warning Pause job: Tells Muster to pause a job if it finds a warning in the log
- Logs warning Pause client: Tells Muster to pause a client if it finds a warning in the log
- Logs warning Add job template to client’s exclusions list: Tells Muster to add the job template to the client’s exclusions list if it finds a warning in the log
- Logs warning Add job to client’s exclusions list : Tells Muster to add the job to the client’s exclusions list if it finds a warning in the log
- Logs warning Requeue chunk: Tells Muster to requeue a chunk if an error is found in its log
- Logs errors enable check: Tells Muster to enable checking of errors inside the logs produced by a process. Searched keywords or contents are specified in each template
- Logs errors Pause job: Tells Muster to pause a job if it finds an error in the log
- Logs errors Pause client: Tells Muster to pause a client if it finds an error in the log
- Logs errors Add job template to client’s exclusions list: Tells Muster to add the job template to the client’s exclusions list if it finds an error in the log
- Logs errors Add job to client’s exclusions list : Tells Muster to add the job to the client’s exclusions list if it finds an error in the log
- Exit code warnings enable check: Tells Muster to enable checking of processes warning return codes. Return codes considered warnings are specified in each template
- Exit code warning Pause job: Tells Muster to pause a job if it finds a warning in the exit code
- Exit code warning Pause client: Tells Muster to pause a client if it finds a warning in the exit code
- Exit code warning Add job template to client’s exclusions list: Tells Muster to add the job template to the client’s exclusions list if it finds a warning in the exit code
- Exit code warning Add job to client’s exclusions list : Tells Muster to add the job to the client’s exclusions list if it finds a warning in the exit code
- Exit code warning Requeue chunk: Tells Muster to requeue a chunk if a warning is found in its exit code
- Exit code errors enable check: Tells Muster to enable checking of processes error return codes. Return codes considered errors are specified in each template
- Exit code errors Pause job: Tells Muster to pause a job if it finds an error in the exit code
- Exit code errors Pause client: Tells Muster to pause a client if it finds an error in the exit code
- Exit code errors Add job template to client’s exclusions list: Tells Muster to add the job template to the client’s exclusions list if it finds an error in the exit code
- Exit code errors Add job to client’s exclusions list : Tells Muster to add the job to the client’s exclusions list if it finds an error in the exit code
- Exit code errors Requeue chunk: Tells Muster to requeue a chunk if an error is found in its exit code
- Logs errors Requeue chunk: Tells Muster to requeue a chunk if an error is found in its log
The following window shows the processes execution faults and chunks timeout properties:

- Process execution faults enable check: Tells Muster to enable checking of faults during processes executions
- Process execution faults Pause job: Tells Muster to pause a job if it reports a fault during processes executions
- Process execution faults Pause client: Tells Muster to pause a client if it reports a fault during processes executions
- Process execution faults Add job template to client’s exclusions list: Tells Muster to add the job template to the client’s exclusions list if it reports a fault during processes executions
- Process execution faults Add job to client’s exclusions list: Tells Muster to add the job to the client’s exclusions list if it reports a fault during processes executions
- Process execution faults Requeue chunk: Tells Muster to requeue a chunk if it reports a fault during processes executions
- Chunks timeout faults enable check: Tells Muster to enable checking of timeouts of chunks
- Chunks timeout faults Pause client: Tells Muster to pause a client if a chunk expires
- Chunks timeout faults Add job template to client’s exclusions list: Tells Muster to add the job template to the client’s exclusions list if a chunk expires
- Chunks timeout faults Add job to client’s exclusions list: Tells Muster to add the job to the client’s exclusions list if a chunk expires
- Chunks timeout faults Kill clients rendering the job: Tells Muster to kill any rendering activity if a chunk expires
The following window shows the mailing and the web server properties:
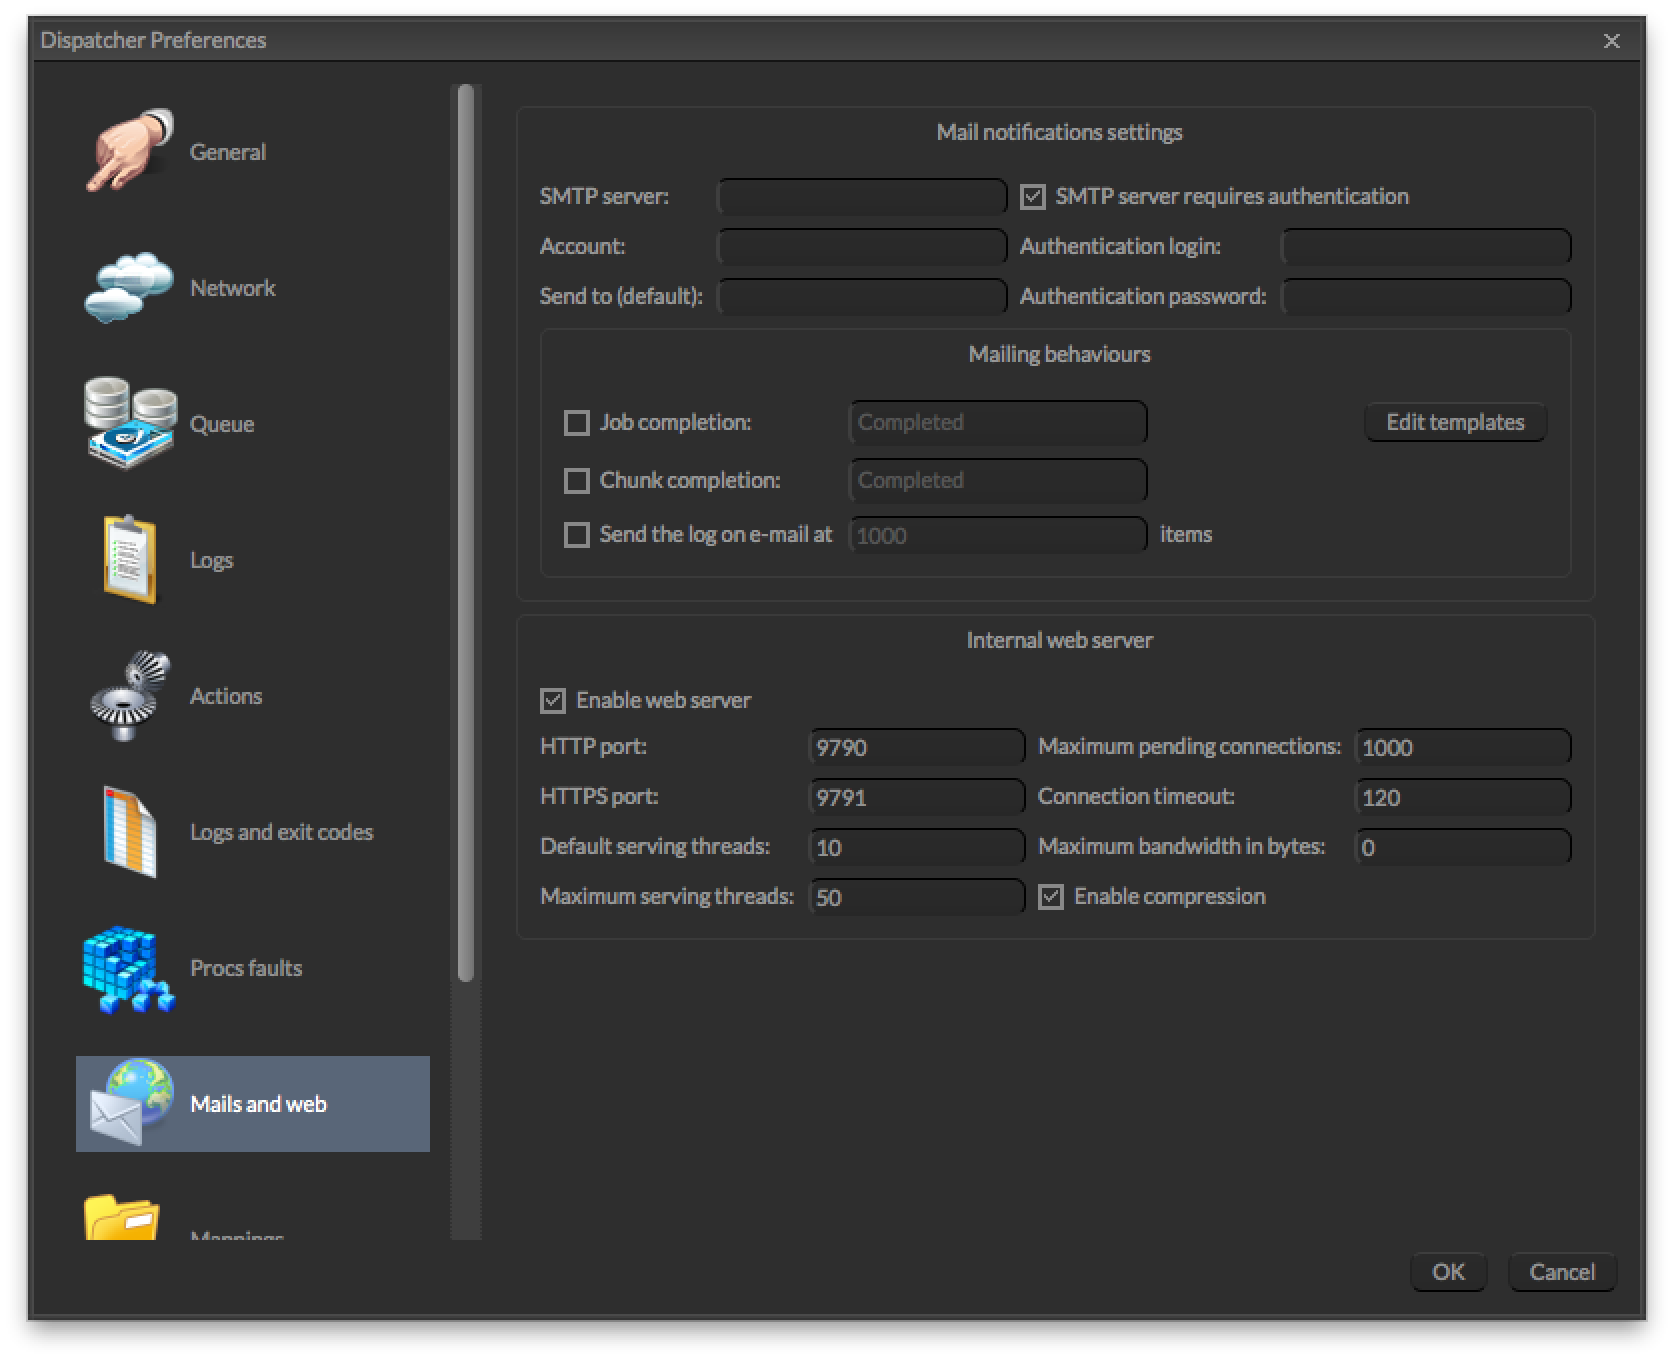
- SMTP server: Specifies the SMTP server to use when sending e-mails
- SMTP server requires authentication: If your SMTP requires authentication, check this box
- Account: The mail account to use when sending e-mails in the form mail@domain
- Authentication login: If you need authentication, put your login here
- Authentication password: If you need authentication, put your password here
- Send to (default) : Default destination address for notifications
- Mailing behaviors Job completation: Enables notifications for a particular job event
- Mailing behaviors Chunk completation: Enables notifications for a particular chunk event
- Enable web server: Enables the integrated web server binding it to the listening ports
- HTTP port: Port to listen for incoming HTTP connections
- HTTPS port: Port to listen for incoming HTTPS connections (SSL encrypted)
- Default serving threads: Number of threads that listen for incoming connection by default
- Maximum serving threads: Maximum number of concurrent serving threads allocable by the web server
- Maximum pending connections: Maximum number of pending connections in the queue of the web server
- Connection timeout: Global timeout for each web server connection
- Maximum bandwidth in bytes: Maximum bandwidth allocable by the web server for each connection
By clicking the Edit templates button, you can modify the templates used to generate the mails for each notification:

The following window shows the drive mappings properties:

If your Dispatcher is Windows based and you want to statically map some network drives, just configure them in this section by using the drive mapping editing window.
You can tell the Dispatcher to mount or un mount the drives at specific times. I.e. by telling the Dispatcher to un mount the drives after the job completion, you can keep under control the total amount of connection to your file server and limiting the client licenses required.
Render pools

A Render pool is a logical group of instances. By defining render pools, you can tell Muster to use a specific subset of instances/hosts to render a particular job, limit the usage of the resources for a particular user, and wake up some instances when they are effectively required by configuring the wake up on Lan feature.
You can use the Dispatcher Pools dialog to create new pool , duplicate them , and assign available instances to existing pools.
The list on the right shows you the available instances. As soon as you click on a pool in the left view, the instances still not part of that pool will be shown and you’ll be able to assign them using the left arrow button.
If you want to remove an instance from a pool just click on it and click the right arrow button. This will remove the instance and put it back in the availability list.
You can configure pools on the fly while the Dispatcher engine is active. Existing jobs will automatically inherit the new settings.

Pools can also have special features like automatic pool assignment based on the host name and / or the IP addresses. You can also set a queue-level priority (to give an additional priority value to the jobs depending on the pool they target) or an instance-level priority (to define an additional priority to instances belonging to a pool).
Repositories ( formerly Substitution paths)
Substitution paths engine is a fundamental tools for cross-platform rendering. As you probably know, the way the system manages file paths is completely different between Windows and Unix based systems like Linux and Mac OS X.
When you submit a job, you tell Muster where the file for this job is, where is its project and where you want to store the files. You embed this information using the path coding of the platform you’re running the Console on.
But what happens when the job is submitted to an instance, or the Dispatcher requires access to the file contents (i.e. Image slicing assembling) ? Muster uses the substitution paths configuration. It exchanges back slashes with forward slashes where required, and transform the paths according with the rules you configure.
This is an example of the Repositories dialog:

No matter if you have a longer or shorter path, just put the path prefix to be exchanged and Muster will do the work.You can also configure a path exchange exclusively for one host (think about an host mounting the shares in a different way or on a different drive) or for one particular user (think about a user connecting from home with a total different mounting scheme).
Even paths substitution may be case insensitive (depending on the settings in the Dispatcher preferences), always be sure to specify the paths with their correct case. Linux and Mac OS X are sensitive to cases, so even the exchange of the path may happen correctly, you may still encounter issues if the case doesn’t match the target file system.
 Repositories configurations are also used to browse your file system from the web browser. Remember to configure at least one path to your network shares even you’re not going to use cross platform rendering or you won’t be able to access the files from the web.
Users management
Muster let you work using its own users and groups database, as well as bind and import an existing database using LDAP or Active Directory technologies. If you’re going to use the built-in users and groups, you can configure them using the Users and Groups tabs of the following window:

Once you add an user or you want to configure a new one, click on the Rights button. This is the user rights configuration window:

- Member of group: You can specify the groups assigned to the user
- User’s permissions: This list defines exactly what rights the user has
- Enable home folder: Tells Muster to create a folder as an home for the user
- Limit views and actions on home folder: Each action of the user is limited inside his home folder. The root of the queue is hidden to him and he cannot see jobs belonging to other users unless an Administrator moves them inside the user’s home folder.
- E-mail address: The user email used for built-in notifications
- Allowed templates: Limits the usage of specific engines
- Limit by pool: Limits the usage only to instances belonging to specific pool
- Maximum allowable instances: Defines the maximum number of concurrent instances allocable by an user
- Reset password: Resets the user’s password
- User substitution paths: Defines user’s custom substitution paths defined in the repositories section

This Window let you specify LDAP or Active Directory specific settings. By configuring LDAP you can tell Muster to download the users and groups accounts directly from an external authentication server.
Please refer to your system administrator for LDAP specific settings. You can also customize query fields as well as specific LDAP settings by clicking the Advanced settings:

It’s often a good practice to test your LDAP settings before importing the users inside the Muster database. Having a bad configured LDAP server may lead to authentication errors and you may need to reset the configuration by manually editing the dispatcher.conf file, to avoid being locked outside the server itself.